12.01.2009

Spiced Brandied Cherries


Jon and I, wanting to replicate those really delicious black cherries you'll find in your drink at cocktail bars that pride themselves on freshly squeezed juices and handmade elixirs decided to try our hand at homemade maraschino cherries. I waited until the height of cherry season back in August when you can score a huge bag for next to nothing and decided on the recipes featured in this New York Times article from a few years back. The recipe had the integrity, and minimal ingredient list I was looking for. And in addition to the Maraschino Cherries, the article also had a recipe for Spiced Brandied Cherries which sounded good enough to try, you know since I was already pitting tons of cherries. Turns out they're much better than their 'true' maraschino counterparts. Maraschino cherries are supposed to be sour to begin with, and then you soak them in alcohol, and they kinda fade to a greyish maroon that's not very attractive. And you're left wondering why you did this to all those lovely peak season cherries. But the brandied ones rely on a simple syrup base, a small amount of brandy, and some lovely hints of spice. Which make them absolutely delicious! You can of course plop them in cocktails, but they're also great with ice cream or along side any chocolaty dessert. And while a batch made with fresh cherries does have a bit more plumpness than one made with frozen, I think the frozen variety would make a great holiday gift or easy to assemble dessert this time of year.


Spiced Brandied Cherries
from the NY Times

1 cup sugar
1 cup water
2 whole cloves
1 2" piece of cinnamon stick
2 cardamom pods
1 quart sweet cherries, stemmed and pitted if fresh
1/2 cup cognac or other aged brandy

In a small saucepan combine sugar, spices, and water and bring to a simmer stirring until sugar dissolves. Allow to simmer for 5 minutes. Remove from heat and add cherries and brandy. Allow to cool. Store mixture in jars refrigerated for at least 2 days and up to several months.

10.07.2009

Lentil and Roasted Vegetable Salad with Yogurt Tahini Dressing


This is a great way to show off colorful fall produce like purple and yellow carrots or various hues of cauliflower. The sweet roasted vegetables, smokey spices, and earthy lentils come together with a bright and tangy yogurt tahini dressing for a light meal perfect for when the weather's just starting to cool down.

Lentil and Roasted Vegetable Salad with Yogurt Tahini Dressing
Serves 2

1/4 head cauliflower, broken into bite sized pieces
2 medium carrots, sliced into large chunks
1/2 head fennel, sliced 1/4" thick
1 tbsp olive oil
1/2 tsp brown mustard seeds
1/2 tsp fennel seeds
1/2 tsp cumin seeds
1/4 tsp smokey paprika
1/2 cup dry beluga lentils
1 bay leaf
1 cup mixed greens
salt and pepper to taste
2 tbsp plain nonfat yogurt, preferably greek
2 tsp tahini
1 tsp lemon juice
1/4 cup shelled pistachios

Preheat oven to 400. Toss cauliflower, carrots, and fennel with olive oil, spices, salt and pepper and spread evening in an oven proof skillet. Roast for about 20 minutes until vegetables are softened and crisp on the edges. Let cool slightly before serving. Meanwhile, fill a small saucepan with lentils, bay leaf and enough water to cover by about 1". Bring to a boil and turn heat down to a low simmer, cover and let cook about 15 minutes until water has been absorbed and lentil are softened. Remove from heat, uncover and let cool slightly.

Combine yogurt, tahini, and lemon juice and whisk until smooth.

On a salad plate, spread lettuce, then top with vegetables and lentils, spoon dressing over top. Finish with chopped pistachios and serve warm.

Southwest Salad with Cornbread Croutons


Warm and crisp from the oven, the croutons on this salad are a delicious way to use up leftover cornbread. Especially if it's started to go a bit stale. And with corn, sweet potatoes, and black beans it's a filling and substantial salad perfect for a light dinner or hearty lunch.

Southwest Salad with Cornbread Croutons

Serves 2

2 tbsp buttermilk
1/2 tsp chopped chipotles in adobe
1/2 tsp honey
1 tsp mayonnaise
1 tsp red wine vinegar

1 small sweet potato
1 tsp olive oil
2/3 cup black beans, drained and rinsed
1/2 cup sliced cherry tomatoes
1/3 cup corn kernels, blanched
1 small avocado, chopped
1/2 green bell pepper, chopped
2 cups romaine, chopped, washed and spun dry
1/2 cup cubed cornbread
salt and pepper to taste
sesame seeds, optional

Preheat oven to 400. Cube sweet potato and toss with olive oil, salt and pepper. Bake for 15-20 minutes until soft in the middle. Set aside to cool. Meanwhile, combine buttermilk, chipotles, honey, mayonnaise, and vinegar in a large bowl, whisk to combine. Add black beans, tomatoes, corn, avocado, pepper, lettuce, and sweet potatoes, stir to coat evenly. Season with salt and pepper. In an oven safe skillet or baking sheet, arrange cubed cornbread in a single layer and place under broiler until just beginning to brown. Remove from oven and top salad with warm cornbread croutons and sesame seeds if using.

Baked Eggs in Ham


For their impressiveness, these are pretty simple. In fact the really hard part is communicating to your deli guy how thick you want the ham to be sliced. I went in with the wrong approach telling him I'd like them a 'little thicker'. To me, this meant not the paper thin slices you'd want piled on a cold sandwich, but you know, something just a little thicker. He started pinching his fingers together somewhere around 1/2 an inch. So, I specified, 'oh no, just like 1/16'. When I give people precise measurements they often give me this look that says you must not know what you're talking about. And then they proceed to make comparisons or hold something up to verify that I actually mean what I said. I really should remember to preface my request with 'I'm an architect so I'm very familiar with rulers and I do know what an inch looks like, no need to show me . . .' So the deli guy asked if the ham should be the thickness of a nickle. To which I replied 'yeah sure', it's close enough. And then I received 2 slabs of ham, a bit chunkier than I would have liked, but still manageable.

Baked Eggs in Ham
Makes 2 Ham Cups

2 1/6" ham slices
4 cherry tomatoes
2 large eggs
1 tsp chopped herbs, such as parsley and chives
salt and pepper to taste

Preheat the oven to 375. In a muffin tin, or similarly sized ramekins, fold ham slice so that it sits inside and forms a cup, repeat with second slice. Break the eggs into each ham cup and top with herbs, tomatoes, salt and pepper. Bake for 20 minutes, then finish under the broiler if white is not yet set. Serve warm from the oven.

9.08.2009

Heirloom Tomatoes, yuck!

I'll admit it, I've bought heirloom tomatoes for $6.99/lb just cause you know, they're heirlooms, so they must be better than regular tomatoes. But then you get them home, and they're not. In fact they have a mushy, overripe texture and less flavor than those Mexican grape tomatoes sold in plastic clamshells all year long. But when you see that display the next time around with 5 different colors of oddly shaped tomatoes you buy into it again. And sometimes they really are some of the best tomatoes you've ever eaten.


Back in February, when Jon and I were reading seed packets at the store and dreaming about summer, we decided to grow 3 kinds of tomatoes. Jon chose Siberia - a small to medium cool weather variety, I chose Principe Borghese - an Italian plum to grape sized tomato 'ideal for sun drying', and then we decided on some Cherokee Purples - a 'sweet and smokey' heirloom, that 'matures moderately early compared to other heirloom varieties'. I treated them all the same at first, and 2 of the 3 were eager to grow strong and lush. I thinned and transplanted them to little 2" individual pots, then to 6" pots, then weaned them off of heat and artificial light to their summer home outside in 15" tubs. But the Cherokees were slow to grow. When the Principe Borghese's were 2' tall plants thick with leaves, the Cherokees were little spindly runts. But, mostly because Jon wouldn't let me give up on them, I treated them like they would one day be just as strong, just as lush, just as fruit laden as the other tomatoes. And after a while I started to believe it. They eventually started to grow and gave off a few branches and then a few flowers (even a couple mega-blooms), and eventually they had beautiful little green tomatoes on them, oddly shaped just like the heirlooms at the market. They slowly started to turn yellow, and then a pale peachy red, and then, it went downhill.


They still haven't reached the deep brownish red tone they're supposed to have when ripe. And most of the tomatoes are deeply splitting and thanks to the rainy weekend, growing mold and providing both shelter and nourishment for bugs. They're not appealing, even with months of work invested, I'm not interested in eating them. The Siberia and Principe Borghese's on the other hand have given a constant month long supply of perfect tomatoes which are surprisingly delicious - fresh and juicy, folded into omelets, roasted at a high temperature to split their skins, slowly cooked to maximise their sweetness, split and baked with bread crumbs and parmesan, in a tian with zucchini and eggplant, sauteed with spicy chickpeas . . . I've been eating lots of tomatoes.


But the really crazy part is, these are not the high end heirloom tomatoes you're supposed to love. These are just normal, pedestrian varieties that grow easily and produce buckets of fruit even when you forget to water them for a few days or the weather turns ridiculously hot (for the Northwest) or characteristically rainy and cold. I would say I'm done with heirlooms - they're over hyped and disappointing! But then truth is, I just bought some yesterday - Green Zebras, on sale for $3.99/lb - I just couldn't resist.

8.25.2009

Popsicles

I bought some Popsicle molds earlier this summer and have found some really delicious, and lowfat treats to make with them. The cherry yogurt pops are a great way to use up less than perfect fruit and could be made with other berries or stone fruit just as easily. And the addition of cocoa to the Vietnamese Coffee popsicles turn them into a delicious grown up fudgecicle. I made mine decaf so I could enjoy them anytime.

Cherry Yogurt Popsicles
Makes about 4

2 cup pitted sweet cherries, fresh or frozen
1/4 cup sugar
splash of lemon juice
1/2 cup plain nonfat yogurt
1-2 tbsp honey


In a medium saucepan, combine cherries, sugar, and lemon juice. Bring to a simmer over medium heat and allow to cook for about 5 minutes until fruit is softened slightly and exuding juice. Allow to cool. Puree fruit mixture in a blender until smooth. In a small bowl, combine yogurt and honey. Pour cherry puree into Popsicle molds filling the first 1/3 of the mold. Then spoon some of the yogurt mixture and continue alternating until the molds are filled. (If you have extra puree, it makes a good smoothie). Use a wooden skewer to swirl layers together. Freeze atleast 3 hours.


Vietnamese Coffee Popsicles
Adapted from David Lebovitz
Makes about 4

1 cup espresso or strong coffee
1/3 cup sweetened condensed nonfat milk
1 tbsp cocoa powder, optional
Water to taste


In a small saucepan, combine cocoa powder and brewed coffee and simmer over low heat whisking to dissolve cocoa. Add condensed milk and stir to combine. Thin mixture with water if desired. Pour into Popsicle molds and freeze atleast 3 hours.

8.05.2009

California Road Trip

When I moved out west 3 years ago and bought my first car in nearly 6 years, I had this fantasy of driving down the coast to California wine country where I'd meet up with my other west coast friends for a long weekend of wine tasting in the pastoral countryside. Unfortunately I'd imagined it to be a much shorter drive than it is. And well, I kinda gave up on my dream road trip. It turns out, there are plenty of fun places to drive to that are much closer to Seattle and we've taken advantage of many of them - from wine tasting in the Willamette Valley for delicate Pinots and Chardonnay, the Columbia Valley for bolder reds and sweeter whites, Portland for great food, design, and an adorably walkable downtown, Vancouver for international cuisine and great shopping, and of course all the National parks just a few hours away.

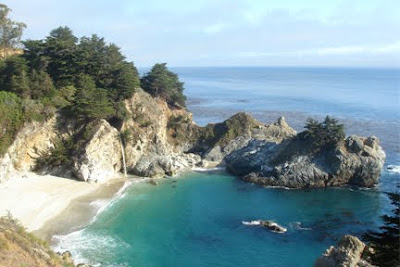
But when the opportunity came up for a trip to Berkeley and Santa Monica, Jon decided it was time for a California road trip and some wine tasting along the Central Coast. After consulting with friends, we decided on our route - fly into Oakland, then spend the weekend in Berkeley, head straight down on I-5 spending most of the week in Santa Monica and then head up along the coast on 1 and 101 stopping in Santa Barbara, San Luis Obispo, Paso Robles, and Carmel before flying back home again. The drive from San Luis Obispo to Carmel was particularly beautiful - Jon and I were both saying 'oh wow' around every bend.


But what I didn't expect to enjoy so much was the drive down on I-5. I'd never seen the San Joaquin Valley before and, to be honest, I'd imagined it to be much more like East Coast farmland - lush and green with agriculture replacing native plants. And, granted, it is the height of the dry season on the West Coast, and we've had an especially hot and dry summer but it was amazing to see the orchards that were no longer irrigated with row after row of sun-fried trees (and the billboards announcing the "congress created dustbowl"). It was also a lot of fun to identify the various crops. My favorite hard to identify crop actually came at the tail end of our trip near Santa Cruz - neither Jon nor I could figure it out - Jon guessed they were a cross between onions and pineapples . . . they turned out to be artichokes and we were very excited when we finally saw he fields filled with ready to pick artichoke heads.

Our other great discovery was burrata cheese, which appeared on the menu at nearly every restaurant we tried. I've since discovered it's a highly perishable cheese - a mixture of fresh mozzarella 'rags' and cream stuffed into a mozzarella balloon. And it is only produced in Southern California and in Italy - although apparently it can be flown in to other cities within it's 2-3 day lifespan. It's delicious - mild and creamy with a consistency similar to a soft goat cheese. And apparently, it's best served simply, and usually during the summer along with some ripe heirloom tomatoes and basil.

We had some amazing food during our travels - perhaps proving Jon's assertion that "food is better in California". I've included a few of our favorites below -

Gjelina
1429 Abbot Kinney Blvd, Venice, CA
This was probably my favorite in LA - it's very noisy and dark, but the food is amazing. My friend Colin and I both had wood fired pizzas, their specialty, and I had the roasted asparagus with a very spicy and very good romesco sauce.

AOC
8022 W 3rd St, Los Angeles, CA
Small and delightful plates and great wine to match. Jon loved this place, I thought it was lovely but was just a little bit jealous as he was raving about his trout and pork dishes. The beet salad and fried cheese were both delicate, beautiful, and scrumptious - so I can't complain.

Real Food Daily
514 Santa Monica Blvd, Santa Monica, CA
Since I was dining alone for most lunches, I decided to go for vegan food! I was not disappointed with my huge chopped salad and berry tea, although it was a bit spendy for lunch.

Sebastian's Store
442 Slo San Simeon Rd, San Simeon, CA
This was written up in one of Central Coast magazine as one of the best sandwich shops around. And after the 40 minute wait for a cold sandwich I was beginning to regret my decision. But once we finally sat down to eat, I didn't mind so much - the sandwiches were huge and well composed with really fresh ingredients, and very California with plenty of avocado and sprouts.

Big Sur Bakery
47540 Highway 1, Big Sur, CA
I'd seen this mentioned on 101 Cookbooks, as they have a newly released cookbook that I'll have to check out. Unfortunately we made it up there a few hours after devouring our gigantic sandwiches, so we weren't all the hungry. I did get some coffees and a large blondie which was a yummy snack for the road. If you're up this way, it's a nice pit stop, especially considering the convenience store nearby charges airport prices for soft drinks, and they do serve meals too.

Little Napoli Bistro
Dolores & 7th, Carmel-By-The-Sea, CA
Jon and I both loved our pastas - I had the Rosso e Bianco, with a light alfredo sauce and stewed cherry tomatoes ontop, and Jon had the Bolognese. And our dessert - some sort of chocolate hazelnut ice cream ball, was a perfect ending to our meal.

Basil
San Carlos St, Carmel-By-the-Sea, CA
We had almost given up on lunch in Carmel when I spied this place in the back of a courtyard. It was surprisingly well priced for Carmel and had really delicious sandwiches and salads with very fresh ingredients. I had the grilled peach salad with candied walnuts and feta cheese, and Jon had a perfectly seared ahi tuna sandwich on french bread.

And as for wineries, we liked all that we tried - Peachy Canyon, Wild Coyote, Tolo, Carmody-McKnight, Eberle, and JanKris.

8.04.2009

Farmer's Market Tour

Jon and I visited with Jon's dad in Berkeley the weekend before last and when asked what I wanted to do while we were in town, I immediately suggested a visit to the farmers market. To be honest, since moving to Seattle I've become less and less enchanted with farmers markets. But I suspect it has more to do with Seattle than with farmers markets in general. And the Berkeley Market is supposed to be one of the best.

Growing up outside of Philadelphia we would frequent farm stands and occasionally farmers markets for sweet corn and tomatoes in the summer, and apples and pumpkins in the fall. Fresh and simple, they were just a good place to pick up better quality and locally grown produce. Later in Ithaca, NY where I attended college, the farmers market was a mecca for hippies and Moosewood types with plenty of vegan food, folk music, and edible flowers. It was fun, but not the most convenient place to pick up groceries. Plus, you can't exactly expect farmers to grow much in a climate where it snows for 9 months straight. Later when I lived in New York, the Union Square market was such a perfect contrast to city life - with wildflowers and country pies, and it was located within walking distance of Whole Foods and Traders Joes which made getting everything I needed, or more accurately everything I could lug home, so much easier.

And then I moved out to Seattle, just in time for summer. I started frequenting my neighborhood farmers market. I had a whole Saturday routine down - brew some locally roasted coffee, go for a walk in one of the cities many parks, and end with a trip to the market - for fresh flowers, cherry tomatoes, and artisan breads. But as I grew more accustomed to life in my new city, I started realizing that everything I liked at the market could be purchased elsewhere and without all the hassle. And I started to grow resentful of farmers markets for high prices, short hours, long lines, and sub par produce sold as if it's the most precious thing around.

But when I went to the Berkeley market, all the resentment melted away. They had beautiful displays of heirloom tomatoes and every kind of summer squash imaginable, and a militant no bag policy - that while inconvenient when traveling without ones green bags, seemed to fit perfectly with their purpose. And unlike Seattle, everything seemed fresh, relatively bug free, and reasonably priced. The allure of farmers markets was back! (With our bounty, Jon's dad made a lovely pasta dish with tomatoes and zucchini and I made a variation on my quinoa salad with grilled peppers, summer squash, and red onions, fresh tomatoes and avocado.)

Later in the week, we drove down to LA where and I was able to check out the Wednesday Santa Monica market. And it kinda blew the Berkley market out of the water. Maybe it's just the novelty of having several kinds of locally grown avocados available or the bundles of fresh Japanese and Vietnamese shiso leaf. Or the fact that right in the middle of an uber commercial urban mall, they closed down the streets for stand after stand of fresh and locally produced food. But it made me want to move right then and there. Unfortunately since we were staying in a hotel at that point, I couldn't really cook anything. So, I limited my purchases to freshly squeezed pink grapefruit and Valencia orange juices, a pint of California strawberries, and a muffin. But it was all delicious!

7.13.2009

Socca and Soupe au Pistou

I've been wanting to make Socca, a chickpea crepe made in Nice, similar to the Italian Farinata, for some time. Chickpeas have long been one of my favorite foods and I'm somewhat fascinated with their varied uses in ethnic cuisines. This is a particularly fast and easy recipe using chickpea flour (Though according to some sources, the batter should rest for several hours - I usually start the batter first, then cook everything else, and finish the crepe just before serving). I paired it with soup, but feel free to enjoy it on it's own. And for a more authentic take on it, check out David Lebovitz' explanation.


Socca

Makes 2 10" rounds

2/3 cup chick pea flour, such as Bob's Redmill
2/3 cup water
1 sprig rosemary
1/8-1/4 tsp cumin
1/2 tsp salt
1 tbsp olive oil, plus more for pan
salt and pepper to taste

Combine flour and water and whisk until smooth. Remove rosemary leaves from stem and roughly chop. Add rosemary, cumin, and salt to batter. This can be done well in advance, let sit at room temperature until ready to bake. Place a 10" cast iron skillet under the broiler and allow to heat until smoking (about 5-10 minutes). Remove pan and add enough olive oil to coat the bottom of the pan liberally. Add the batter and quickly tilt pan to spread the batter over the surface. Return to the broiler and heat until firm and bubbling on top. Use a large spatula to remove the socca from the pan and onto a cutting board. Brush the top with olive oil, salt, and pepper and cut into bite sized pieces. Repeat with remaining batter. Serve hot.


Soupe au Pistou

Soup seems like a strange thing to have in the middle of summer, but we've had a few cooler days lately and it's quite good served warm rather than steaming hot. Plus, it tastes like summer. Filled with fresh summery produce and cooked just long enough to make a delicious herbal broth drawing out the essence of the ingredients, it is a light cousin to winter minestrone. And a one pot meal that cooks easily with little attention.

Feel free to vary the ingredients to suit your tastes and what you have on hand. Just keep in mind you want to stick with fresh summer vegetables.

Pistou

40 medium basil leaves
3-5 cloves garlic
2 tbsp olive oil
salt to taste

Finely mince and then smash together with the side of a knife the garlic and basil. When thoroughly combined, move to a small bowl and add oil, stirring to combine. Add salt to taste.


Note: You can also do this in a blender of food processor, but I find it's easier in smaller batches to use a knife.

Soup
Serves 4

2 tbsp olive oil
3/4 cup fennel, chopped (about half a bulb)
1 rib celery, diced
1/4 large onion, diced
1 medium carrot, diced
1 medium red or yellow potato, diced
2 cloves garlic, minced
1 bay leaf
3 sprigs thyme
4 cups water
1 medium zucchini, diced
1/2 cup chopped cherry tomatoes
1/3 cup small pasta, such as macaroni, orzo, or broken capellini
1 14.5 oz can white beans
salt and pepper to taste

In a large stockpot, heat the oil over medium high and add in the fennel, onion, carrot, celery, and potato. Saute for about 3 minutes until all the vegetables are well coated and slightly softened. Add the garlic bay leaf and thyme, and saute another minute. Then add the water and cover, let simmer for about 20 minutes until the vegetables are fork tender.


Add the zucchini, tomatoes, and white beans. And simmer for another 5 minutes. Then add the pasta and cook through, about 10 minutes. Remove the thyme stems and bay leaf. Check seasoning.

To serve, ladle soup into a bowl and top with a large spoonful of the pistou.

Remodel Complete and S'mores!

Last weekend, Jon and I hosted our first party in over six months. We started gutting the kitchen the last weekend in January and have been working consistently ever since. And what a change it has made! The layout is much more open now and great for entertaining. The counters are a beautiful white quartz which is really a joy to cook on - no worries about staining or scratching, and so easy to clean up. Plus, like nice white plates, they make everything you put on them look so much better.

To be honest, the kitchen has been more or less done for some time. We've been cooking in there for a few months now. But the finishing touches - the penny round backsplash with deep blue grout, the trim work around the cabinets, and (to my great frustration) the cabinet hardware were left til the very last minute. And Jon and I both scrambled to get everything put together before our great unveiling at our Fourth of July party.

I'm happy to say, both the kitchen, and the party were a great success, and we look forward to many more meals in our beautiful new space.

The back wall of the kitchen which originally held both the range and the fridge is now more open with ample work space (ok, ok, it's still a small urban kitchen . . . ) on either side of the range. Recessed spot lights in the ceiling and dimmable under-cabinet puck lights (Jon routed out the cabinetry trim work so that these would be flush and the wiring hidden from view) provide great working and ambient light.

We left more open area around the window - the upper cabinets used to butt up right next to it - and painted the trim a pale grey which really helps to open up the space and and make the window feel more expansive. And with the white upper cabinet doors and white counters, the natural light we do get is bounced around and makes the whole space feel bright and sunny.


We decided to open up the layout and nix the large peninsula that once separated the kitchen and dining room. Which led to some compromises, and a happy result- the pantry wall that stores a great deal of food and equipment rather stylishly, and serves as a bar and buffet area while entertaining (during the week we use it as a breakfast nook housing our coffee grinder, toaster, and bowls of fresh fruit).


And the completion of the kitchen also led to a few furniture updates in the rest of the space - our new dining set picks up on the shiny white cabinetry and modern feel of the kitchen. And we hope to decide on an area rug and curtains soon to soften up the space. But for now, we're really enjoying our revamped condo.

As for the party, we served All American food - chips and dips, delicious stuffed jalapenos, baked beans (which I nearly forgot to serve), classic potato salad with lots of fresh herbs and pickles, cucumber, radish, and red onion salad, burgers and dogs, and for dessert homemade (star-shaped) strawberry shortcakes and made-from-scratch S'mores, which were amazing!


The S'mores recipes for homemade graham crackers and marshmallows came from Smitten Kitchen, with just a few changes. I happened to see Ina Garten making s'mores from chocolate covered digestive biscuits and thought that was a wonderful idea - no more messing around with thick chunks of Hershey's not well portioned for the graham cracker sizes. But, I also wanted that classic graham cracker taste so I made the dough and cut 2" rounds for the crackers and coated them, top and bottom, in melted milk chocolate (Hershey's Reserve - staying true to my Pennsylvania roots). I cut the marshmallows in 1 1/4" rounds that melted into a gooey mess perfectly sandwiched in each set of crackers.

6.29.2009

Savory Snacks

I made the mistake of asking my father what he might want for a fathers day treat. I was imagining all sorts of decadent chocolate concoctions, perhaps with gooey peanut butter or crispy bits of toffee. But to my surprise, when I asked, he told me he was trying to lay off of chocolate for a while. I was lost. I had no idea what to make. Somehow all the other flavorings you might add to sweets - berries and citrus, spice, coconut . . . they all seemed somehow feminine, and so inappropriate for fathers day. I decided I had to steer clear of sweets altogether.

I landed on Sesame Crackers and Mixed Nuts with Capers and Lemon. Both are delicious despite being very simple to put together, and both should last atleast a week, kept in an airtight container, making them a perfect choice for care packages, or just yummy make ahead party snacks.

I was expecting a cracker recipe to be loaded with butter. But these seem to get most of their fat from the sesame seeds themselves. Which gives them a nice rounded buttery flavor and a lovely golden brown crispness. To be honest, they're not overwhelmingly sesame-y. If I were naming them, I'm not sure I'd emphasize the sesame as the combination of thyme and pepper dominates their flavor.


Sesame Crackers
Originally Sesame Rounds, Martha Stewart, Holiday 2007

1 cup flour
1/2 tsp salt
1/8 tsp pepper
1 tsp lemon zest
pinch cayene pepper
2 tbsp chopped fresh thyme
3 tbsp sesame seeds, unhulled
2 tbsp cold unsalted butter, cut into small pieces
1 large egg white

Heat oven to 350.

In a food processor, combine flour, salt, peppers, zest, thyme, and 2 tbsp sesame seeds. Pulse, then add butter and pulse until it resembles coarse meal. Add 1/4 cup cold water and process until dough comes together.

Roll out dough on a lightly floured surface to about 1/8". Cut into desired shapes. I did rectagles, but the orignial recipe calls for 2 1/2" circles. Transfer pieces to an ungreased cookie sheet. Brush with egg white and sprinkle on remaining sesame seeds and coarse salt. Bake until firm and golden brown, about 25 minutes.

Let cool on a wire rack. Store at room temperature in an airtight container for up to 1 week.


With crispy fried capers that melt on your tongue and a delicate dusting of lemon zest and pepper, these are fairly addictive.


Peppered Mixed Nuts with Lemon and Capers
Adapted from Martha Stewart, Holiday 2007
Makes about 4.5 cups

1 1/2 cups drained capers
3 cups assorted mixed nuts, unsalted
1 tbsp lemon juice
1 tsp ground pepper
1 tbsp lemon zest
canola oil for frying, enough to cover the pan by 1"

Preheat the oven to 300.

Drain capers on a paper towel for about an hour, or until dry. Heat oil in a stockpot until it registers 350 on a deep fry thermometer. Add 1/4 of the capers and fry until golden brown and crisp, about 3 minutes. Continue to fry in batches and drain on a paper towel.

Combine 2 tbsp cooking oil (from capers) with nuts, lemon juice, and pepper on a lined baking sheet. Toast in oven for 25 minutes, let cool. Sprinkle with lemon zest and combine with capers. Store in an airtight container, up to 2 weeks.


And despite the lack of chocolate gooeyness, my dad loved them both.


6.17.2009

Strawberry Buttermilk Cake


I've seen this cake in the June issue of Gourmet, and then on SmittenKitchen, and then on several other blogs. If fact, I feel like I've seen it, or a version of it just about everywhere I look lately. And, I've been wanting to try it for some time. The original recipe features raspberries, but suggests it would be equally yummy with other berries, and since I'd picked up some luscious, and ready-to-use-right-now strawberries from the store, I decided strawberry it was!

This cake is quite a bit sweeter than most desserts I would make. The batter in fact smells a lot like a typical cake mix, but in a really divine smells-like-childhood kind of way (not that my mom used cake mixes often, but I've been around them once or twice). To be honest, I almost liked the batter better, but the finished product is also quite good. And the whole thing comes together rather easily with minimal prep.


The Gourmet recipe only butters and flours the pans, which worked on one ( I doubled the recipe), but one of my cakes was not so lucky - the strawberries formed little soft sticky spots in the finished cake that stuck to the pan and only half my cake released, with quite a lot of effort. Next time, I would definitely use a greased parchment round in the bottom (the sides did not stick) to prevent this. Or, you could also just serve it from the pan.

Strawberry Buttermilk Cake
Serves 6

1 cup flour
1/2 tsp baking powder
1/2 tsp baking soda
1/4 tsp salt
1/2 stick butter, softened
2/3 cup plus 1 1/2 tbsp sugar, divided
1/2 tsp pure vanilla extract
1 large egg
1/2 cup well-shaken buttermilk
1 cup fresh strawberries, cut into quarters


Whisk together flour, baking powder, baking soda, and salt in a small mixing bowl. In a mdium mixing bowl, cream together 2/3 cup sugar and butter until light and fluffy. Add vanilla and egg and continue to beat until well incorporated. Alternate additions of flour mixture and buttermilk, beginning and ending with flour.

Butter and flour a 9" cake pan. Cut a 9" round of parchment, place on bottom of buttered pan, butter parchment. Pour batter into prepared cake pan spreading evenly. Scatter strawberries ontop and sprinkle over remaining sugar.

Bake for 25 to 30 minutes or until a toothpick inserted in the center comes out clean. Let cool 15 minutes, invert, and place on a rack to cool completely or serve warm.

Tofu-Asparagus Salad

I'm not a huge fan of sushi restaurants. Sure they'll often have atleast a couple vegetarian options, but they're often uninspired and leave you feeling as though you'd like a real meal after that nice light snack you just had. But recently Jon and I went to a new sushi place in Ballard (MoshiMoshi) that I loved! Mostly because of their asparagus tofu salad, with silken tofu, blanched asparagus, avocado, and an addictive sesame vinaigrette. For dinner, I paired it with some edamame and a veggie roll, but it makes a great light lunch all it's own.


And so I've done my best to recreate it at home. I left out the avocado and replaced it with cucumber, but feel free to improvise with other light vegetables - blanched young peas might also work well.

Tofu-Asparagus Salad
Serves 1

6-8 medium asparagus stalks, trimmed
6 cherry tomatoes, halved
3" length of english cucumber, seeded and chopped
1 handful of young lettuce, or butter lettuce
1/4 avocado, diced (optional)
1/3 block of firm silken tofu

2 tsp soy sauce
2 tsp mirin
2 tsp rice wine vinegar
1 tsp toasted sesame oil
1 tsp tahini
1 small garlic clove, finely minced
1/8 tsp chili paste

1 tsp toasted sesame seeds
2 scallions, thinly sliced

Blanch the asparagus until bright green and just tender. Remove and immediately rinse under cold water to stop the cooking. Combine soy sauce, mirin, vinegar, oil, and tahini in a small bowl, and whisk until well blended, add chili paste and garlic. Assemble salad, starting with lettuce leaves as a base and piling vegetables seperately on top. Spoon dressing over and top with sesame seeds and scallions.

6.10.2009

Pink Grapefruit Margaritas


Of course I'm way too classy to buy jugs of margarita mix. But, I'm not above frozen drinks, and I'm not above adding a little extra fruit. Pink Grapefruit is an obvious choice, it is refreshing, tangy, a little bit sweet, and adds a lovely pink blush to the drink. Plus, it's not so "girly" that boys are necessarily opposed to drinking it.

This recipe makes a rather slushy, and immediately drinkable consistency. If you prefer your margaritas to be mounded up above the rim of the glass, freeze the grapefruit juice in ice cube trays for at least 2 hours ahead of time.


Pink Grapefruit Margaritas
Serves 2-4

coarse salt
grapefruit wedges (slice midsection from grapefruit used for juicing)

1 grapefruit, about 5 ounces
2 limes, about 2 ounces
4 ounces reposado tequila (such as Hornitos)
1 ounce triple sec
1/2 - 1 ounce simple syrup*
2 rounded cups of ice cubes

Using grapefruit wedge, lightly coat rim of glass with juice. On a small plate, spread a semi circle of salt and dip half of glass into salt.

Squeeze juices from grapefruit and limes and combine with remaining ingredients in a blender. Pulse until ice is thoroughly blended. Pour into prepared glasses and garnish with a grapefruit wedge. Serve immediately.

* To prepare simple syrup, combine equal parts sugar and water in a saucepan and heat until boiling, let simmer for about 1 minute and turn off the heat. Allow to cool to room temperature and if not using right away, bottle and refrigerate for up to one month.

6.01.2009

Homemade Veggie Burgers


Back before you could find garden burgers in every grocery store and on the menu at just about every diner, sports bar, and burger joint it was a lot of work to make a vegetarian burger. Growing up there were 2 kinds I liked - one was a powdered mix, similar to a falafel mix that rehydrates and formed a pretty tasty grain based burger, the other were my mom's tofu burgers. Her recipe combined crumbled tofu, egg, bread crumbs, and cooked rice with a few flavorful ingredients - cheddar cheese, ketchup, minced onion. They were firm, and fairly neutral in flavor, perfect for loading on the toppings. My version is based on her recipe with a few updated ingredients. I've replaced the rice with quinoa for added protein and a bit more earthiness and added grated carrots sauteed mushrooms and walnuts for moisture and a 'meatier' flavor. They are sturdier than most bean based burgers, but rather delicate compared to a beef burger, and won't hold up well on the grill. But they are really good, much better than a garden burger (and I've grown to like garden burgers) and I feel better eating something made from fresh wholesome ingredients naturally high in protein than their highly processed counterparts. This recipe makes an All-American burger that pairs well with ketchup and traditional fixins, but the vegetables and seasonings can easily be adjusted to make them better bases for other condiments.

Homemade Veggie Burgers
Makes 4 large patties

1 tbsp plus 1 tsp olive oil
2 cups crumbled tofu
1 cup cooked quinoa
1 grated carrot
1/4 medium onion, finely chopped
6-8 crimini or button mushrooms, diced
1/4 cup finely chopped walnuts
1 egg
1/3 cup bread crumbs
1/2 tsp soy sauce
1/2 tsp vegan Worcestershire sauce
1 tbsp ketchup
1/8 tsp celery salt
pinch cayene pepper, to taste
salt and pepper to taste*

Saute mushrooms in 1 tsp olive oil until browned, season with salt and pepper. In a medium bowl, combine remaining ingredients with mushrooms, thoroughly mix with your hands. Place in the fridge for atleast 20 minutes before forming 3/4" thick patties. Preheat oven to 350. Heat remaining 1 tbsp oil in a large oven proof skillet over medium high. Add burgers and cook on each side for about 2 minutes until a golden brown crust forms. Transfer to the oven to cook through, about 10-15 minutes.


* I like to combine all ingredients expect for the egg and taste for seasoning before adding the egg. If you'd like to make these vegan, or divide the recipe, you can replace the egg with some vegan (or regular) mayonnaise.

I made the Food & Wine Cheddar BLT burgers for Jon and shared the suggested condiments and fixins, sans bacon. It's a really nice All-American burger and the Tarragon Russian Dressing really makes it special. And on the side we had some spicy roasted potatoes with yogurt dill sauce and a fresh succotash salad.

5.30.2009

The Kitchen Garden


When Jon and I first met he loved telling his friends that I grew my own herbs. At that point, it was just a couple pots outside my front door. He also liked to garden - one of his first gifts to me was a homemade wooden box filled with his own tomatoes. Half of which were delicious, and half of which were a strange spongy consistency, and well, not something you'd want to eat. But out of guilt I chopped them up and put them in an omelet, just to say I'd used them. The next year we both started our basil in the cool wet spring that seemed to go on forever and found it shrinking back to nothing. I brought mine inside and nursed it back to health and eventually had an abundant crop by mid summer, and Jon's shriveled back to a single brown stem about 3" high. He kept it all season long, right there along with his other plants. He also managed to grow some unappetizing looking round yellow cucumbers along with a healthy crop of grape and cherry tomatoes and some very lush cilantro, dill and fennel.

This year, we decided to take it up a notch and grow from seed. Because a) it's a lot more impressive, and b) if your basil plant dies it only takes a few weeks to grow a new one, and at a fraction of the cost. I think the most important thing with gardening, especially on windy balconies that get limited amounts of sun, is to just have fun and hope for the best. If you set yourself up to expect a full garden all summer long that will replace trips to the grocery store or save you bundles of money, you're going to be disappointed. Gardening is unpredictable, time consuming, and sometimes expensive - 3 months of grow lights, bundles of pots, and bag after bag of potting soil and seed starting medium start to add up. But it's really fun to see something go from a tiny seed to a thriving plant and better yet, one you can cook with. And it's really great to come home at night and be able to pick something fresh from the garden for dinner.


Our herbs - started in February, repotted twice, and transitioned to the outdoors in the last 2 weeks. From left - Italian Basil, Dill, Parsley (supposedly flat leaf, but rather wavy), Thai Basil, Cilantro. We also have Rosemary, Chives, and Lemon Thyme to round out our summer collection.


Lettuces - Romain, Merlot Leaf, Mesculin Mix, 'Mervielle de Quatr Saisons' Butterhead, and below, the last of our arugula crop which started the bolt last week. Lettuces, especially those you eat as babies can be planted every few weeks in the summer. In warm sunny weather they only take a few weeks to go full circle so this will ensure a near constant supply.


And our vegetables - French green beans (just starting out), fava beans, tomatoes. We have 3 varieties of tomatoes, which one day I lost track of when moving the pots around, so it'll be a suprise when they actually start to produce fruit. One of the three varieties is rather runtish and is still small and weak whereas the others have become a couple feet tall, full, and covered in little buds. Actually, I threated to toss them and Jon has adopted them as 'his' tomatoes that he plans to bring back to health. They are a bit stronger these days. We'll have to let you know how they turn out.


Our balcony garden with a few flowers mixed in.

5.27.2009

What to Serve with Mashed Potatoes


I love potatoes! All kinds of potatoes prepared all sorts of ways - potato soup, potato salad, roasted potatoes, fried potatoes, and of course mashed potatoes. But for way too long I struggled with what to serve with mashed potatoes. They make sense with meat. All you need is a big slab of meat and mashed potatoes and you've got a meal. But what do you serve when you want that 'meat and potatoes' feel, but you don't care for the meat?

I'm fond of these lentil walnut patties. They're rich and, um kinda meaty, and can be dressed up with some mushroom gravy for special occasions. And hey can be prepared in advance and cooked or reheated later.

Lentil Walnut Patties
Serves 2

1 tbsp olive oil, plus more for frying patties
6-8 crimini mushrooms, washed and sliced
1/2 medium onion, chopped
1 clove garlic
1/2 tsp dried rosemary or thyme
1 pinch red pepper flakes
1 cup crumbled tofu
1 cup cooked lentils
1/3 cup finely chopped walnuts
3 tbsp white wine, or vegetable stock
1 tsp soy sauce
1/2 tsp vegan Worcestershire sauce
1 tbsp mayonnaise
1/4-1/2 cup bread crumbs
salt and pepper to taste

Heat olive oil in a small skillet, add mushrooms and onions and saute over medium low heat until caramelized and soft. Add white wine, herbs, and pepper flakes and allow liquid to evaporate. Remove from heat.

Combine mushroom mixture with lentils and walnuts in a food processor and pulse to make a coarse puree. Spoon mixture into a bowl and combine with remaining ingredients holding back last 1/4 cup of bread crumbs. Thoroughly mix ingredients until mixture comes together into balls adding remaining bread crumbs until mixture is no longer sticky.


Preheat an oven to 350. Form 4 patties about 3/4" thick. Heat a small amount of oil in a large skillet over medium high heat and add patties only after the pan is heated through (to avoid sticking). Cook for 2-3 minutes per side until they are crisp and golden brown. Then move to the oven to finish cooking for about 10 minutes.

Serve plane or topped with gravy or white sauce.

5.16.2009

White Bean & Crimini Bruschetta

I love white bean bruschetta in it's simpler forms, with some roasted garlic and a bit of rosemary or thyme it's creamy and earthy and so easy to bring together. This is a slightly dressed up version that adds sauteed mushrooms both as a juicy topping and combined in the puree for another earthy component adding depth and richness.

This can be made in advance, but is best served at room temperature so remove from the fridge well before serving.


White Bean and Crimini Bruschetta
Serves 4

6-8 crimini mushrooms, cleaned and thinly sliced
4 sprigs lemon thyme
1-2 cloves minced garlic
1 tbsp white wine or dry vermouth, optional
4 tsp olive oil
1 14.5 oz can cannellini beans, rinsed and drained
salt and pepper to taste
baguette, sliced into 1/2" pieces


In a medium skillet, saute the mushrooms in 2 tsp olive oil. When they begin to darken in color, add garlic, and season with salt and pepper. Remove thyme leaves from stems reserving tops for garnish. Add thyme and wine, if using, to mushrooms and remove from heat when crisp and browned around the edges. In a food processor, combine drained beans with half of mushroom mixture and remaining olive oil. Pulse until well combined and taste for seasoning.

Toast baguette slices under the broiler for a minute or two until lightly browned and crisp, flip and briefly toast other side. Spoon bean puree onto toasts and top with reserved mushrooms and thyme sprigs. Serve at room temperature.

5.11.2009

Indian Spiced Chickpea Salad


Last fall I'd eagerly awaited the opening of Poppy, Jerry Traunfeld's experiment with Indian influenced dishes in a 10 dish thali presentation. He offers 2 a night - one with meat and one vegetarian, as well as an abbreviated 6 dish thali of each. Perhaps it was just that our expectations were set so high from months of chatter and promises that this would be one of the best new restaurants of 2008, but we were less than impressed with our meals. It's difficult to make 10 stand out dishes and many just seemed like filler. But there were a few stand outs - my chanterell croquettes were amazing and so rich you wouldn't want a larger serving. And the yogurty chickpea dish was perfectly balanced with nuanced flavors. And luckily, the recipe was featured in Food and Wine later that month.

The recipe calls for whole seeds of brown mustard, cumin, and fennel, and I would suggest you try to find them whole rather than ground, but you can make substitutions if necessary.

Indian Spiced Chickpea Salad
Adapted from Jerry Traunfeld, F&W 9/08

Serves 3

1 15-ouce can chickpeas, rinsed and drained
2 tsp canola oil (or other mild oil)
1/2 tsp brown mustard seeds
1/2 tsp cumin seeds
1/2 tsp fennel seeds
1/8-1/4 tsp red pepper flakes
1/3 cup plain yogurt (nonfat or lowfat will work)
2 tsp lemon juice
2 scallions, thinly sliced
1/8 cup chopped mint
1/8 cup chopped cilantro
1/2 tsp salt

Heat oil in a medium skillet until they begin to pop. Add cumin, fennel, and red pepper and saute until fragrant. Scrape into a mixing bowl.

Add drained chickpeas and remaining ingredients. Mix until throuroughly combined. Serve immediately or refrigarate. If refrigarated, remove from fridge atleast 15 minutes before serving to bring to room temperature.